Monday, May 27, 2013

Water Beads for Babies at Play

Water Beads and Glass Gems

It’s been forever since I brought out the water beads and I thought it had been long enough!  So, I set up a fun invitation to play that included these wonderful beads.
water beads,  sensory play, glass gems
  • Red glass gems
  • Blue water beads
  • Tongs
  • Spoon
I placed it all inside a plastic storage box to attempt to contain the mess.
J explored each bowl for a bit, than immediately stepped in the bowl of water beads.  And that is where he spent most of his play.
water beads, glass gems, sensory play
He did get his hands in the squishy beads too.  I mean they feel so fabulous, you just have to touch!  He didn’t really play with the gems this time.  I’ll have to mix them together next time to give him a different sensory experience. Plus, we’ll be able to talk about hard vs. soft and the different textures of the gems and beads.
water beads, glass gems, sensory play
A few things about water beads:
  • You can find them in the floral section of any craft store.  I bought mine at Walmart for $5 a package.
  • They start out as tiny little beads.  They become these big, cool, soft, beads after being soaked in water for a few hours. 
  • They are not environmentally friendly, so I don’t throw mine out when we’re done. Instead, I lay them out on a paper towel in a box, and set them in a dry place.  I put mine on top of our kitchen cabinets.  After a few days they will return back to their original tiny size and can be reused over and over again.

Have you ever played with water beads? They really are fantastic. My husband comments about how cool they feel every time I bring them out.  Truly, they are fun!

Water Beads and Shaving Cream Play for Kids

Water Beads and Shaving Cream: 2 Messes in 1!

IMG_2868

I’ve been determined to find fun ways of playing with water beads that didn’t include me tearing my hair out.  Read my past experience with water beads if you don’t know what I’m talking about.
I was looking in my craft closet the other day and I saw our can of shaving cream.  I immediately thought…shaving cream is getting boring, how can I use it in a different way? 

Then BAM!  it hit me!  Let’s cover the water beads in shaving cream!

I dumped the water beads in our sensory tub and covered them in shaving cream.  The texture was amazing! 

J isn’t always very happy getting his hand dirty, so I included a spoon and some cups.
IMG_2861

He was a little weirded out by the shaving cream and didn’t put his hands all the way in the mess, but he did enjoy scooping up the beads with the cups and dumping them out.  He soon forgot that his
hands were covered in shaving cream, and just enjoyed the play.
IMG_2887

The best thing about this is that the water beads will not bounce all around when covered in shaving cream.  They do make pretty cool designs when dropped though!

IMG_2871

It’s an easy clean up because the shaving cream washes off so easily.  Remember, water beads can not go down the drain!  I used a colander to rinse them off before drying them out again.

This is a wonderful sensory activity for any aged child. It kept J’s attention for a long while and encompasses so many different senses.  Plus, for messy play, it’s not THAT messy!

Check out other ways we’ve played with water beads!

If you like this, you'll love all the other fun stuff I share over at my Facebook and Twitter pages.
Come on over and join the fun!

Creative Painting with Water Beads

Creative Painting-Water Beads

Water beads, or 'water babies' as my preschoolers have always called them, come in a pouch of sand sized beads that when soaked in water grow to various sizes, depending on which ones you purchase. We use them for a variety of things in our curriculum from sensory tables to sink and float experiments, and we have rolled them around in paint before, but today we had a different idea. 

We often times let them grow, use them, then let them shrink back down, grow them, shrink them, and so on.  This time, before they shrink back down(a process which takes quite a long time), I decided that we could sacrifice a few for the sake of art.
I started by adding a few to a paint tray.
Then I added tooth picks to the water beads.
We use liquid water color for almost everything.
Fill the cups with paint.
Voila!  Masterpiece!  Now, some things to note:
  • This will make a mess.  If you do not like messes, this is not for you.  
  • If you use plastic toothpicks, they won't suck up the color, but what's the fun in that?
  • You don't have to use water color paint, it just is a favorite for the kids.
  • Don't expect the water beads to stay on the toothpicks, because the point of this exercise isn't water bead balance.  It's learning about them falling off, chasing them around, poking them with the toothpicks, rolling them, pinching them, smashing them, and all of the fun things that you can do to boost those fine motor skills.  
  • Do not direct what they are painting.  This isn't an, "Okay class, let's paint a portrait of your family" type of thing.  It's purely exploratory and learning cause and effect. 

Have some fun and get creative with the things you use to paint with!  Reclaim those old water beads and smash them to oblivion in the name of art!

Trust me, you're gonna love it!

Painting with Water Beads

Water Bead Painting

We have so many water beads left over from the group sensory play date we recently hosted, and have been trying to find new ways to explore with them.  The other day while we were playing with the water beads on our light table, Rosie asked to paint.  "Great idea", I thought.  Let's paint with water beads!
Water Bead Painting


Painting with water beads is very similar to marble painting.  Since painting and playing with water beads are two of Rosie's favorite activities.  I was so excited to combine them!

I placed a small hand full of water beads in clear cups, and added tempera paint.  I then set out a shallow box  with paper inside.  I was anxious to see how Rosie would handle this activity.  Would she pick up the water beads, and place them in the box, or pick up the cups, and dump the water beads into the box?


                                           Rosie decided  that dumping was best suited

She was enthralled!  As with most toddlers, Rosie loves filling and dumping containers.
Once Rosie had dumped all the cups, it was time to shake the box around to spread the paint.
Then Rosie began using her hands to manipulate the beads, and further paint the paper.
The squishy gooey beads made her laugh uncontrollably
She loved the texture of the paint and the water beads together. 
Squishing them in her hands
What a beautiful painting!
This was such a fun activity!  Rosie played with the water beads in the box for quite a while after she was done painting.  We will definitely be painting with water beads again! 
~~~~~~~~~~~~~~

Water Beads and Slime Play for Kids

Halloween Slime Exploration

We made Halloween Slime!  Some people call it Gak, but since Halloween is coming up we thought Slime would be a more appropriate name!  We also colored it orange by mixing red and yellow food coloring!  Maybe next we'll make some Black Slime! Keep reading to find out the recipe for slime and all the other FUN C had with it!


Recipe for Slime:
(we got the recipe from Family Fun Magazine here)
Mix together 3/4 cup of warm water, 1 cup of white glue and few drops of food coloring (we used red and yellow) in one bowl.  In another bowl, combine 1 1/3 cups of warm water and 4 teaspoons of Borax (this is usually in the laundry detergent section of the grocery store).  Note: Borax should not be ingested and can cause skin reactions with some----so be careful---use your discretion! Pour the contents of the first bowl into the other bowl and let sit for 1 minute without stirring.  Now you are ready to EXPLORE!

C enjoyed mixing it up!

C enjoyed just kneading it pushing into it!

She had FUN feeling it with her feet and stomping on it (making pancakes)!!! (her idea!)


C added her Water Beads and creatures to it!  She played with this combination a long time! 


Lastly, she tried out cutting the slime with scissors and that was a Big Hit too!
Wouldn't it be FUN to have a batch of water beads and slime out for kids to feel for a Halloween Party?

Have some Slimy Halloween Fun!!!

Space Play with Water Beads

Space play with water beads

space play water beads
Following on from our water bead science experiment, this week we’ve been enjoying some imaginative space play in our water bead sensory tub. With rockets, aliens and a lunar landscape the children have been stretching their imaginations and playing in a totally different world. Here’s how they took their water beads into outer space.

Water bead space play 

space play
The children made some aliens to start off with. Although all the water is drained off the water beads once they’ve swollen to their full size the sensory tub still has some moisture to it, so we decided paper creatures would just go soggy after a while. We wanted to be able to add our characters to the water bead sensory tub so we decided to use permanent markers on foam sheets.
space play
To create the landscape for our space play tub we painted some pieces of card with black glitter paint, which gave us the perfect background. The children then drew some planets and moons on card, covered them with glue, and sprinkled on lots of gold and silver metallic foil pieces. They cut out  the plants and used sticky tape to add a thread on to each one so our planets could really go into orbit.

space play
We use an under-the-bed storage box for our sensory tub, which we popped into an empty paddling pool so the children can sit inside and play and any stray water beads get caught before they skitter off across the room. We taped the black card around three sides of the tub to create our universe, with a cotton thread across the top to suspend our planets. B added a swirling Milky Way.
space play
Our rockets were made from plastic drink cups, with foam pieces stuck on – again, so that they could be safely used in the water beads without going soggy.
space play sensory tub

Creepy Crawly Play with Water Beads

Creepy Crawly Water Beads

Water beads (aqua beads) have become quite the sensory rage in the preschool world.  I first came across them last month when I Can Teach My Child posted a Monster Sensory Tub on one of the It's Playtime posts.  Then The Chocolate Muffin Tree has some Water Bead Fun!!!  with some bugs and other creatures.  Water beads looked like some much fun that I had to check them out for myself.  Lucky for me the dollar store carried them so I bought two containers of them the other day.  Since they were clear, I added some purple food coloring to the container, shook it a bit, and let it sit overnight.  My son's anticipation was growing as he watched them sit on the counter until I was ready to set them out.  I dumped them into a large, plastic bowl and added some spiders, snakes and lizards, as well as some containers for "measuring" and left them on the table for him to enjoy.
Michael explored the texture of the beads first, touching and squishing them.  
Michael compared the beads to boba, which is a form of tapioca used in Asian milk tea and other drinks (one of his favorite things to eat/drink).  We then had the discussion that these are NOT edible!  Since he couldn't eat them, he began feeding the beads to the snakes and spiders.  
Michael loves to pretend cook, so I always provide containers with sensory play.  Pouring back and forth into different sized containers is a great pre-math (volume) activity.

For a child that really enjoys sensory play, I highly recommend water beads!  My son played with them for over an hour!  They are squishy, slimy, wet and have many applications.  Michael has already mentioned he's like to toss them into the bath...we may just give that a try.
What you should know:
  • If you color them, they will stain the hands slightly.  It all washed clean in the bath.  
  • Be prepared for them to land on the floor.  They slip right out of little hands.  
  • Pick them up off the floor right away because if stepped on, they squish into the carpet.  
  • They can be squished by little hands and make a mess.  This is an opportunity to talk to your child about how broken things have to go into the trash and if all the balls are broken there won't be any more for play.  Of course, braking some is part of exploring, which normally I don't mind, but all the squished beads were ending up on the floor, which created a bigger mess, so I had to put a stop to the squishing.    
  • The container says if they dry out, simply spray with water, so they should last a while.  
  • My dogs wanted to eat them.  If you have dogs, I'd stick them outside or away from this activity.  
Additional water bead sensory ideas:
  • Blue beads with sea creatures for an underwater theme
  • Black or purple beads with some plastic eyes or wiggle eyes for Halloween
  • Clear beads and Arctic animals for a winter theme
Have you tried water beads?  Share your link in the comment section!  
You might also like:

Sensory Table Light and Feet


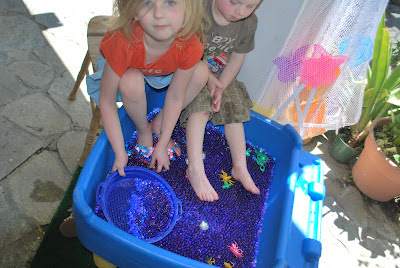
We added water beads to the small water table. I did not anticipate the foot exploration although I do see the appeal and we went with it.
I had little water proof lights the kids could shine into the beads to explore the translucency and color
We also had a sifter
For scooping and exploring the beads

Mikey started out with his hands but the draw was to strong he had to use his feet
I have a basket hanging for our slime exploration it worked great for the water beads too though
Light. beads and bugs
It all started with these stretchy bugs they were on sale with the after Easter stuff for 50 cents a pack so I had to think of something fun to go along with them. And then I thought water beads. What a winning combination.