Black Light Play Date Party


The first thing my husband and I had to do to prepare for the play date
was replace the light bulbs in the messy play area with black light
bulbs. This was very easy to do. We purchased six of these 48" black light bulbs from
our local Walmart, and that was more than enough to fill the room with
fantastic black lighting. My husband and I plan to use the black
lighting a lot and everyone pitched in to cover the cost of the other
supplies needed. You could also use a single blacklight fixture to
fill a smaller space. Prior to this party we were using one purchased
from Walmart for $10 and it was working great for Rosie and Jewel to
explore.
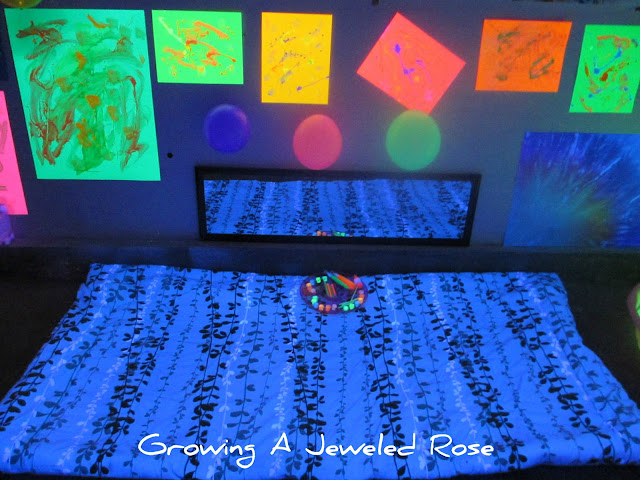
I set the room up similar to the way I had for our first group sensory play date.
I had stations lining the perimeter of the room, with open space in
the middle for the little ones to run around. This is what the room
looked like once it was all set up!
The right side of the room

The left side of the room

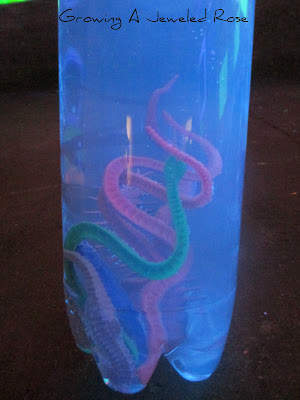
I was so excited for this first station, consisting of various Glowing Discovery Bottles. I couldn't wait to see the babies in the play group manipulate and explore with these!

While researching black lighting online, I discovered that the quinine in tonic water makes
it glow bright blue under the black light. To make the six blue
discovery bottles, I simply peeled the label off of 1 liter bottles of
tonic water, and placed varying items in each one for the children to
discover and explore. You can get two liters of tonic at Walmart for under $1
One discovery bottle was designed to explore objects that sink vs
objects that float. I used marbles and pom poms to make this, and
selected ones that reacted to the black light. When turning the bottle
upside down, the marbles would race to the bottom, and the pom poms
would quickly float back to the surface.

This discovery bottle was filled with snakes and bugs, all of which glowed under the black light
This discovery bottle was filled with the letters of the alphabet, and the idea was to play I Spy while exploring with it by asking the little ones to find varying letters.

Another discovery bottle had glow sticks. Yet another, bounce balls. I
added oil to the last blue discovery bottle in hopes of creating a lava
lamp effect. While it worked, I found that the oil blended to closely
in color with the tonic water so I tried this once more, and used glow
water to make the last discovery bottle.
I emptied the tonic from one of the bottles I had yet to use, and filled
it with glow water. I then added about three tablespoons
of vegetable oil. It worked great!

Next to the discovery bottles, I set up a Face Painting Station.
For this station, I hung a mirror long ways using command tape strips to ensure it would stay in place. I then set out several neon face painting kits so that the little ones could paint their own faces.
The next station was out of this world

I filled a small wading pool with glowing water beads, planets, asteroids, and shooting stars. I found packs of glowing planets and such a The Dollar Tree.

To make glowing water beads, simply use glow water in place of regular water when growing the water beads. If you are unfamiliar with glow water, you can read all about it in my previous post, Glowing Water- Uses and How to Make it! If you are unfamiliar with water beads, you can read more about them here.
This Glowing Bubble Station was really easy to set up. I placed our
bubble machine that we already had on a chair, and made some glowing
bubble solution. That was it! Glowing bubble solution is really easy to
make. I used this recipe, but you could probably use any bubble recipe, and just use glow water in place of water. You can also buy glowing bubble solution if you don't feel like making your own.

I was really excited about this next station. I could not wait to see the children's reactions to a glowing pool of balloons. To make this station, I filled a small pool with black light reactive neon balloons.
These balloons looked so fantastic under the black light! If you want
to recreate this, you only need about thirty balloons. I used about
thirty for the ball pit, and used roughly twenty more to decorate the
room.

Please note- you can also use regular neon balloons. Some
do glow under black light, but you will want to test them before
purchase. Not all things that look neon react to black light.
To test items before purchase, you can carry a blacklight flashlight.
The next station was to be a pool of glowing GOOP.
However, I wanted to wait and mix the GOOP up once the little ones
were there, so this was how this station was set up when everyone
arrived.

GOOP is
so easy to make that I thought it would be fun to mix it with the
little ones, and have that become part of the sensory experience!
While we have made Glowing GOOP before, this time we were going to make it using the various glow waters. I was excited to see the results!
The last station was a Glowing Jello Dig.

To make glowing jello, simply use tonic water in place of regular water in the recipe.
I prepared 12 boxes of yellow jello, and used 12 cups
of boiling tonic as well as 12 cups of cold tonic. You can use any
color jello to make glowing jello. As long as you use tonic to prepare
it, it should glow.
No comments:
Post a Comment